Frost and Kretsch Plumbing

Knowledge Base

Sewer camera inspection in action with a technician examining underground pipes

Sewer Camera Inspection for Accurate Drain Diagnostics

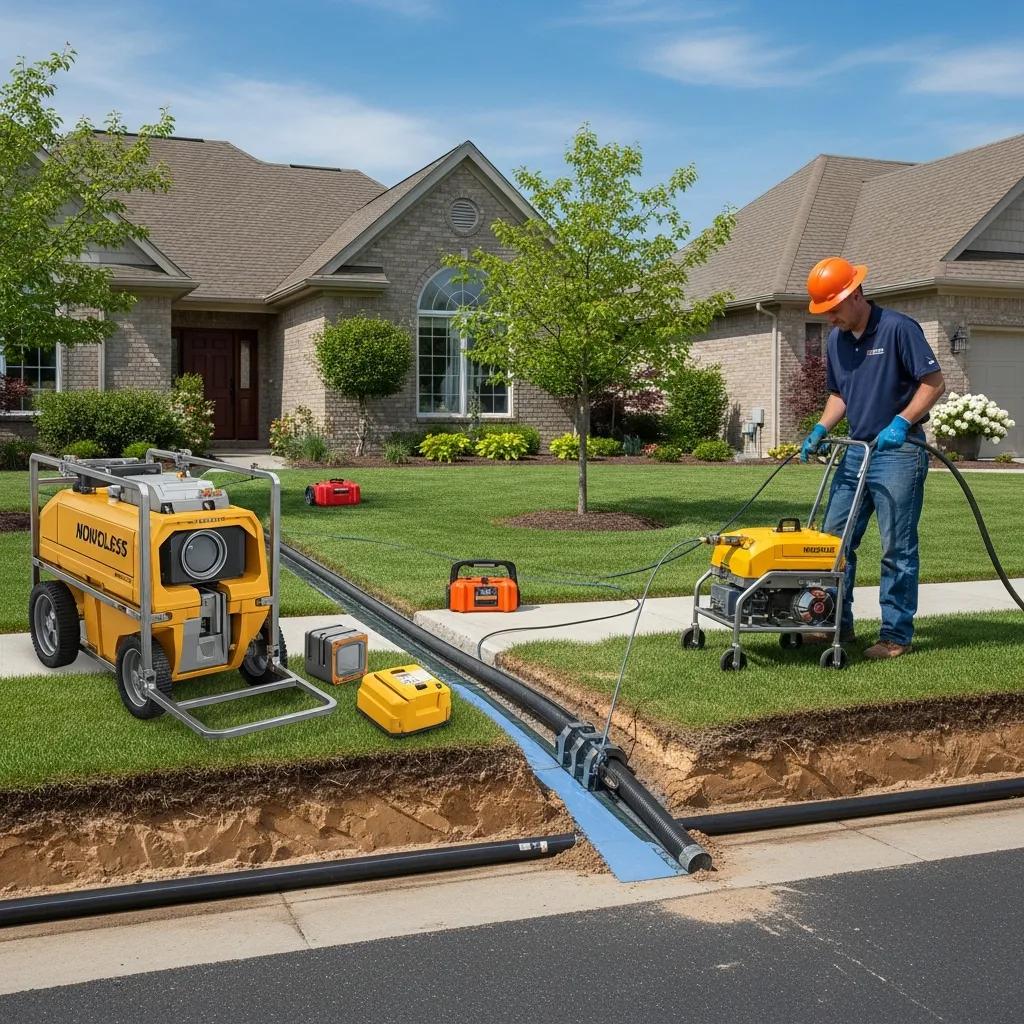
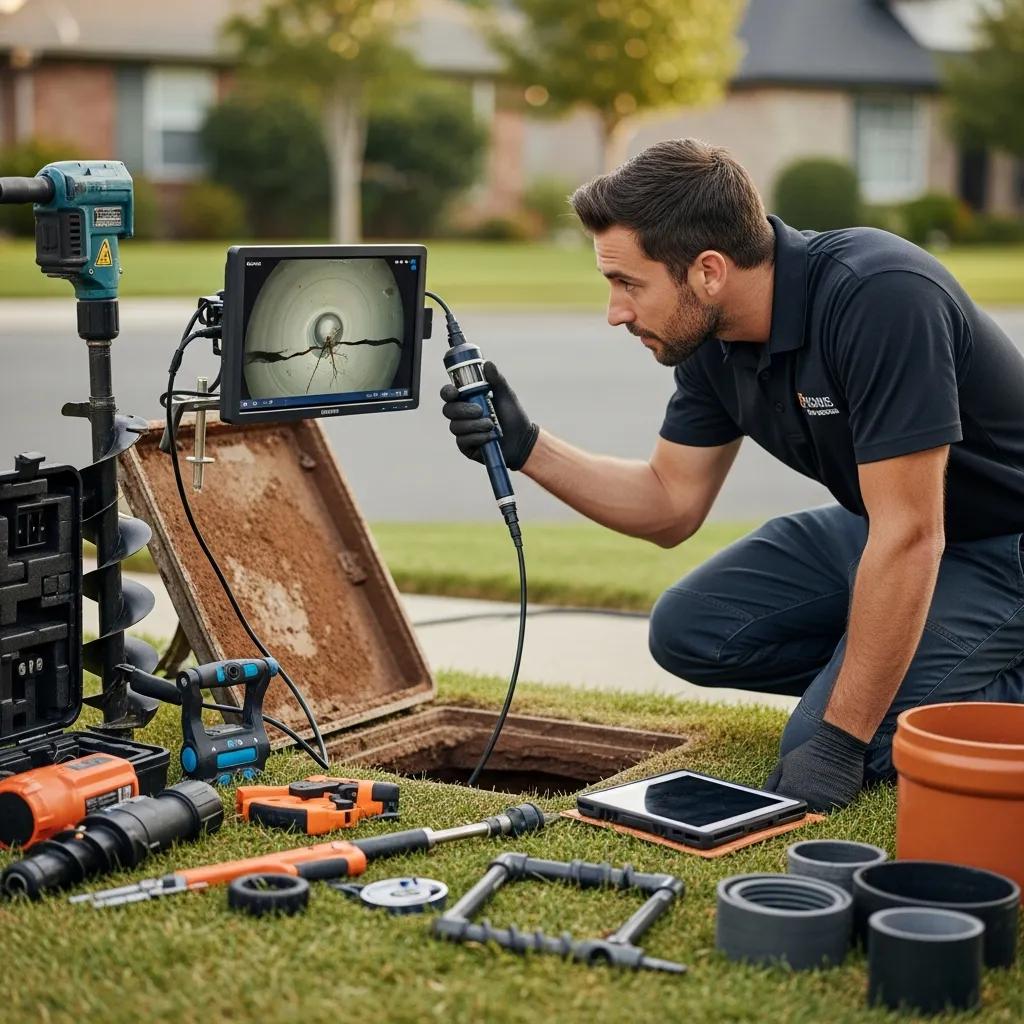
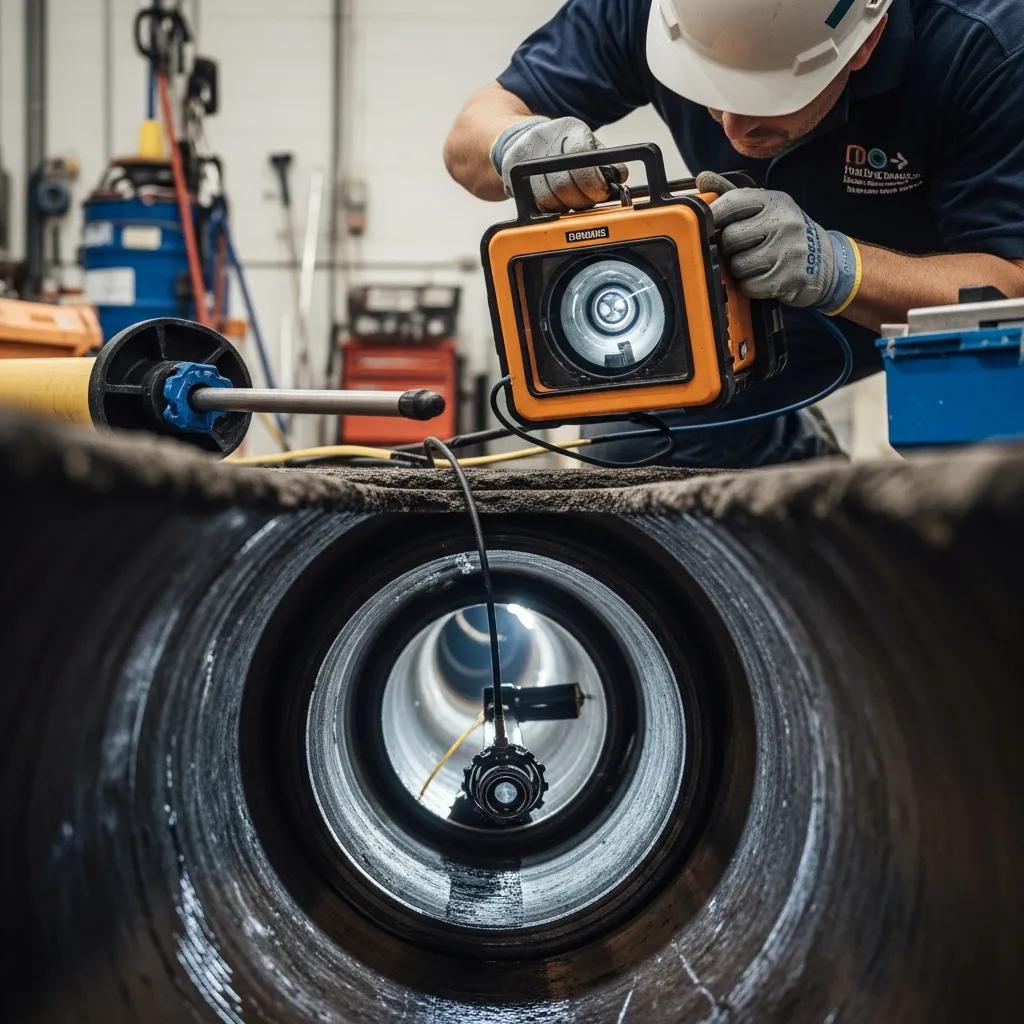
Sewer Camera Inspection in Grosse Pointe — Precise Drain Diagnostics, What to Expect, and Cost Guide Sewer camera inspection is a non‑invasive service that uses a high‑resolution video camera to inspect the inside of underground drain and sewer pipes, giving clear answers without unnecessary digging. This guide walks through how a drain video inspection works, the types of problems a pipe camera can reveal, the main cost drivers, and which residential and commercial services are a good fit for Grosse Pointe properties. Homeowners and building managers frequently face recurring clogs, unexplained backups, or uncertainty during real‑estate transactions — a sewer scope removes guesswork and helps prevent disruptive, costly repairs. Continue for a step‑by‑step overview, common camera findings, straightforward cost explanations, and practical service options for both homes and businesses. You’ll also find targeted lists and tables that define equipment and cost drivers, plus clear guidance on when to schedule a sewer scope or request a site estimate. What Is Sewer Camera Inspection and Why Is It Essential for Drain Diagnostics? A sewer camera inspection places a small, waterproof video camera into your drain lines to capture continuous footage and pinpoint blockages, structural problems, or infiltration points. Technicians push a camera head down the line on a fiber‑optic or push cable while a locator transmits position data above ground, producing video and a mapped route of the pipe. The main advantage is precise diagnosis — crews see exactly where the issue is and can recommend targeted repairs instead of broad excavation. The table below outlines the core components of a typical inspection and the value each provides. The table below summarizes essential inspection components and what they deliver for diagnostic clarity. Component Function Diagnostic Value Video camera head Captures continuous, high‑resolution footage Shows blockages, cracks, roots, offsets and other visible defects Fiber optic / push cable Feeds the camera through pipe runs Allows inspection through long laterals and around bends without digging Locator transmitter Tracks the camera’s position from above ground Pinpoints the surface location of defects for targeted repairs Monitor / recording unit Displays and saves the live video Creates a permanent record for reports, insurance, or real‑estate disclosure Knowing these parts helps explain why video inspection is usually faster, less disruptive, and more accurate than exploratory digging. How Does Drain Pipe Video Inspection Work? Drain pipe video inspection follows a clear, repeatable workflow: access, camera traversal, and reporting. Technicians find a cleanout or access point, remove light obstructions if needed, and feed the camera head on its push cable while watching live footage on a monitor. The locator provides above‑ground coordinates so crews can map where any defect sits relative to the surface. The inspection is recorded and timestamps note anomalies; the final deliverable is a reviewable video plus a diagnostic report that explains condition, severity, and recommended next steps. Understanding this sequence helps homeowners and property managers see how the evidence drives repair decisions. What Are the Key Benefits of Using Plumbing Camera Inspection in Grosse Pointe? Plumbing camera inspection brings several practical benefits for Grosse Pointe properties, especially where older infrastructure and mature landscaping make excavation expensive. The chief advantages are accurate diagnosis, minimal property disturbance, and faster resolution because technicians fix the true cause rather than guessing. Camera surveys protect lawns, gardens, and hardscapes by avoiding trial‑and‑error digging. They also supply objective video documentation useful for real‑estate transactions and maintenance planning. These benefits make camera inspections an efficient first step before committing to larger repairs. Which Common Plumbing Issues Can Underground Pipe Camera Surveys Detect? Sewer camera surveys reveal a wide range of subsurface problems that often show up as backups, slow drains, or intermittent odors. Typical findings include tree root intrusion that narrows the pipe, cracks and offsets that leak or trap debris, bellies (sags) that collect solids, grease and debris buildups, and collapsed sections that cause total failure. Each visual finding points to a recommended response — from root cutting and hydro‑jetting to trenchless sectional repair or excavation. The table below links common camera observations to likely causes and follow‑up actions. Below is a quick-reference table linking camera findings to likely problems and recommended follow-up actions. Observed Condition How It Appears on Camera Recommended Next Step Root intrusion Fibrous fronds or recurring blockage points Mechanical root cutting, then targeted sealing or repair Cracks / offsets Hairline gaps, misaligned joints or visible separations Structural assessment for trenchless repair or section replacement Bellies (sags) Solids pooling at a low spot in the pipe Regrading or localized repair to restore proper slope Grease / debris blockages Thick internal coatings or compacted material Hydro‑jetting followed by a confirmatory camera pass Seeing how these problems look on camera helps property owners choose effective solutions and avoid repetitive quick fixes like repeated snaking without a proper inspection. How Does Sewer Camera Inspection Identify Tree Root Intrusion? Tree roots show up on camera footage as fibrous, frond‑like material pushing into the pipe, often at joints or cracks where roots can enter. Roots seek moisture and exploit weak points; the camera reveals both the root mass and the exact penetration location. That detail tells technicians whether cutting and chemical treatment will be sufficient or whether a structural repair is needed. Technicians will document recurring growth patterns and recommend actions like mechanical root removal, focused repairs at the entry point, and follow‑up inspection intervals to prevent recurrence. What Signs of Pipe Damage Are Revealed by Drain Video Inspections? Drain video inspections expose structural issues such as hairline cracks, displaced joints (offsets), crushed or collapsed sections, and corrosion that shows as thinning or pitting inside the pipe. On camera, these appear as linear fractures, abrupt alignment changes, deformed pipe profiles, or surface erosion. Severity is typically classified as minor (repairable in place), moderate (sectional trenchless repair likely), or severe (full replacement recommended). Matching the visual damage to available repair options helps teams recommend the most efficient approach while protecting landscaping where possible. How Much Does Sewer Line Camera Inspection Cost and What Influences

Sewer Camera Inspection for Accurate Drain Diagnostics Read More »

Trenchless sewer line repair technician using modern equipment in a residential setting

Trenchless Sewer Line Repair: No-Dig Solutions

Trenchless Sewer Repair — No‑Dig Options for Faster, Cleaner Sewer Replacement Trenchless sewer repair uses no‑dig methods—most commonly cured‑in‑place pipe (CIPP) lining and pipe bursting—to fix or replace underground sewer lines while keeping yard and hardscape disruption to a minimum. This guide explains how those no‑dig techniques work, when each is the right choice, and the homeowner advantages you can expect: faster schedules, smaller restoration bills, and longer service life versus full‑dig replacement. You’ll also learn how modern sewer camera inspections steer the method choice, which job factors typically drive costs in Grosse Pointe and nearby counties, and the step‑by‑step workflow from diagnosis to final testing. Comparison tables and clear decision points make it easier to weigh lining against bursting for common failures like root intrusion, corrosion, or collapse. Finally, we explain how a local team like Frost & Kretsch Plumbing can evaluate trenchless options, provide transparent estimates, and respond quickly when time matters. What is trenchless sewer repair — and how do no‑dig technologies work? Trenchless sewer repair is a group of techniques that restore or replace underground pipes without digging long trenches. Instead of continuous excavation, crews work from small access points and either install a cured liner inside the existing pipe (CIPP) or fracture the old pipe while pulling a new one through the void (pipe bursting). The main value is protecting landscaping, driveways and other hardscapes while cutting excavation time and restoration costs. No‑dig methods also shorten downtime for your home or business and reduce the heavy‑equipment impacts of a traditional dig. For homeowners around Grosse Pointe, trenchless options often mean a quicker project and a durable outcome compared with open‑trench replacement. What trenchless repair includes and why it matters to homeowners Put simply, trenchless repair rehabilitates pipe from the inside so the original alignment stays intact while structural strength and flow are restored. CIPP installs a resin‑saturated sleeve that cures into a new seamless pipe; pipe bursting removes the old pipe and pulls in a new line, and can increase diameter when needed. The homeowner benefits are tangible: less yard damage, faster completion, lower restoration expense, and longer expected service life. Trenchless options are especially useful when mature trees, paved surfaces, or narrow lots make open trenching impractical. Because of these benefits, the right first step is almost always a diagnostic camera inspection to confirm whether a no‑dig solution is feasible. With less surface disruption, the next priority becomes a precise inspection to pick the right no‑dig method. How sewer camera inspection guides a no‑dig diagnosis Sewer camera inspection sends a fiber‑optic or push camera through the line to record the interior condition, with distance markers and timestamps that help map defects exactly. Cameras show cracks, offsets, root intrusion, corrosion and collapses so we can choose lining or bursting based on real data instead of guesswork. That accuracy reduces unnecessary digging and helps prevent surprise costs. For homes in Grosse Pointe and nearby counties, an early camera inspection speeds decision‑making and supports a transparent, evidence‑based estimate. Frost & Kretsch Plumbing offers on‑site camera inspections and no‑obligation feasibility assessments if you’d like a local evaluation. Which trenchless methods are available: pipe lining vs. pipe bursting? The two primary no‑dig approaches—CIPP lining and pipe bursting—work differently and suit different pipe conditions. CIPP restores strength by inserting and curing a resin‑saturated liner inside the existing pipe; pipe bursting fractures the old pipe and pulls a new line into place, often upsizing the run. Factors that affect the choice include how badly the pipe is damaged, whether you need a larger diameter, how laterals connect, and site access. The short list below shows typical use cases and trade‑offs so you can match the method to your sewer condition. If the pipe is mostly intact but leaking or vulnerable to roots, CIPP lining often wins because it’s seamless and returns to service quickly. If the pipe is collapsed or you want greater capacity, pipe bursting replaces the line and can increase diameter. Access, lateral reconnections and surface restoration preferences also shape the final decision. Method comparison: the table below summarizes common uses, benefits, limitations, and expected lifespans for quick homeowner reference. Method Best For / Use Case Pros Cons Typical Lifespan CIPP (Cured‑in‑Place Pipe Lining) Cracks, corrosion, root intrusion, small leaks Seamless new pipe inside existing line; minimal excavation; preserves alignment Small loss of internal diameter; needs a reasonably intact host pipe for installation 50+ years (under normal conditions) Pipe Bursting Collapsed pipes, severe structural failure, upsizing needs Full replacement with new material; can increase pipe diameter and capacity Requires two small pits and careful utility coordination 50+ years (new pipe life) Sectional Point Repair / Spot Repair Localized defects, lateral connection fixes Targeted and less invasive for small problem areas Not a good fit for widespread or repeated failures 20–40 years depending on materials That comparison shows how lining and bursting address different failure modes. If you want both options evaluated, Frost & Kretsch Plumbing can run camera diagnostics and recommend the solution that fits your property. How cured‑in‑place pipe lining actually restores a sewer CIPP lining rehabilitates a pipe by pulling a flexible fabric tube saturated with epoxy or polyester resin into the host pipe, then expanding and curing it to form a new, jointless inner pipe. We start with thorough cleaning to remove roots and debris, then invert or pull the liner into place and cure it using steam, hot water or UV light. The cured liner bonds to the old pipe, stops infiltration and root entry, resists corrosion and usually improves flow. Lifespans commonly exceed several decades when installed under the right conditions. CIPP is a great choice when the existing alignment is acceptable and minimizing surface restoration is important—especially on residential runs where access is limited and laterals must be accurately reinstated. What is pipe bursting and when should you consider it? Pipe bursting replaces a failing sewer by pulling a bursting head through the old line, which fractures the existing pipe outward while

Trenchless Sewer Line Repair: No-Dig Solutions Read More »

Professional plumber inspecting sewer line with camera equipment in a residential area

Sewer Line Replacement & Repair with Expert Excavation

Sewer Line Repair & Replacement in Grosse Pointe — Expert Excavation, Trenchless Options, and 24/7 Emergency Service Sewer line trouble can show up as slow drains and repeated backups or as sudden collapses that put your property and health at risk. Spotting problems early helps homeowners and businesses limit damage and control costs. This guide explains how sewer pipes fail, how we diagnose issues with sewer camera inspections and high‑pressure jetting, and when trenchless repairs or careful excavation are the better choice. Frost & Kretsch Plumbing delivers focused sewer replacement, reliable repairs, and expert excavation using licensed crews, minimally invasive diagnostics, and 24/7 emergency response to stabilize urgent situations and plan lasting fixes. You’ll learn common warning signs and root causes, how trenchless methods like CIPP lining and pipe bursting work, practical cost and insurance tips, emergency triage steps, and preventive maintenance including tree root management. We use industry terms such as main sewer line, house sewer lateral, CIPP pipe lining, and sewer camera inspection so property owners in Grosse Pointe and nearby communities can clearly weigh repair options. Common Signs and Causes of Sewer Line Problems Sewer issues usually announce themselves with clear household or yard signs that point to flow problems or structural failure. Spotting these symptoms early narrows diagnostics and helps set the right response level—because a persistent backup or a soggy yard can mean anything from a clog to a collapsed pipe. Below are the most common warning signs to watch for and report to your technician. Early recognition shortens the diagnostic process and reduces the chance of larger, costlier damage. The most common observable signs are: Slow drainage in multiple fixtures — a likely sign of an obstruction or partial collapse in the main sewer line. Repeated sewage backups into sinks, tubs, or toilets — often caused by a downstream blockage or severe flow restriction. A strong sewage odor in the basement or yard — usually indicates a leak or a broken lateral letting gases escape. Wet or sinking spots in the yard with no surface runoff — symptoms of a leaking or collapsed pipe under the soil. Gurgling toilets and drains — commonly caused by trapped air from restricted flow or damaged pipe sections. These observations help prioritize inspections and point crews to targeted diagnostics like sewer camera inspection and jetting to find the exact problem area. Warning Signs That Point to Sewer Line Damage Which signs matter most depends on where they appear and how widespread they are. Slow drainage at a single sink rarely means the main line is failing; slow drains throughout the house plus gurgling points to the main sewer lateral. Soggy patches directly above the buried pipe route often signal a leak or collapse that can worsen quickly. Repeated overflows or sewage surfacing are red flags for immediate professional attention because they indicate a contamination risk. Noting which fixtures are affected and where yard symptoms appear helps technicians plan camera inspections and decide if trenchless repair is possible or if excavation is required. Main Causes of Sewer Line Failure Sewer lines fail from mechanical wear, biological intrusion, and environmental stress that often act together over time. Tree roots are a top cause: roots seek moisture, enter pipe joints, then expand and crack clay or older cast‑iron lines. Corrosion and material breakdown affect older metal pipes and can be accelerated by chemical exposure. Ground movement, heavy surface loads, and poor installation can shift joints and create low spots where solids collect, speeding blockage and structural failure. Knowing these causes guides preventive choices like routine inspections, root control, and selecting the right repair method. How Frost & Kretsch Handles Sewer Line Repair and Replacement Effective sewer repair starts with a clear diagnostic plan, thorough cleaning, and a decision process that matches the failure to the least disruptive repair. Our typical workflow begins with a sewer camera inspection to pinpoint damage, followed by cleaning and high‑pressure jetting to remove roots and buildup. From there we evaluate trenchless options like CIPP lining or recommend targeted excavation when collapse or severe offsets rule out no‑dig fixes. Frost & Kretsch employs licensed, insured technicians, uses minimally invasive excavation practices when needed, offers transparent upfront pricing, and backs work with a satisfaction guarantee. A diagnostic‑first approach reduces unnecessary digging and ensures the repair addresses the actual failure the inspection uncovered. Technicians verify results with follow‑up camera passes and documentation so property owners understand the repair scope and the expected lifespan of the chosen solution. Tool Diagnostic Purpose What It Reveals Sewer camera Visual inspection inside the pipe Shows cracks, offsets, root intrusions, collapses and records severity High-pressure water jetter Cleaning and clearing blockages Removes roots and deposits that hide defects and restores flow for inspection Excavator (minimally invasive) Access for replacement when structural failure exists Exposes external pipe condition, bedding, and connection points for permanent replacement This tools table shows how inspections, cleaning, and careful excavation work together to build a complete picture and guide the best repair choice. Using the right tools in concert reduces guesswork and helps select the least disruptive permanent solution. What Role Does a Sewer Camera Inspection Play? Sewer camera inspection gives a clear, real‑time view inside the pipeline and is the foundation of modern sewer diagnosis. A flexible camera is fed through a cleanout or manhole to record joint integrity, pipe material condition, root intrusion, cracks, and collapses; the results show whether the issue is isolated or systemic. Accurate camera footage lets us plan the right repair—favoring trenchless lining when the pipe is continuous and repairable, or excavation when collapse or severe offsets make no‑dig methods unsafe. The inspection also documents conditions for insurance claims and any required municipal permitting. Accurate diagnosis reduces unnecessary excavation and helps pick cost‑effective repairs that restore function while protecting landscaping and hardscape. When Is Expert Excavation Required? Excavation is necessary when damage exceeds what trenchless methods can reliably fix—examples include collapsed pipes, severely offset joints, or widespread breaks that compromise structural integrity. Excavation

Sewer Line Replacement & Repair with Expert Excavation Read More »

Professional plumber using thermal imaging for leak detection in a home

Professional Leak Detection for Hidden Plumbing Leaks

Professional Leak Detection for Hidden Plumbing Leaks: Expert Services to Identify and Repair Water Damage Risks Professional leak detection finds hidden plumbing leaks with focused diagnostics that stop water damage, prevent mold, and avoid costly structural repairs. This guide walks through how leak detection works, the common signs of hidden water leaks, and the non‑invasive tools—like thermal imaging and acoustic listening—that work best for walls, slabs and underground pipes. You’ll also learn how slab leaks are found and fixed, when a leak becomes an emergency, and how commercial services differ from residential work. We outline a simple, professional workflow for diagnosis and repair and explain how quick action lowers long‑term costs. Throughout, we use clear terms such as leak detection, slab leak repair, non‑invasive leak detection, and hidden water leak signs to help homeowners and facility managers find and act on leak risks quickly. What Are the Common Signs of Hidden Water Leaks in Homes and Businesses? Hidden leaks usually show up through indirect clues before visible damage appears. Escaping water changes moisture, temperature, pressure or utility readings—those changes create signals that, when combined, point to a hidden leak and the need for professional leak detection. Catching these early avoids bigger problems like water damage, foundation issues and mold. Below is a straightforward, easy‑to‑scan list of the most common indicators that warrant follow‑up testing. Unexplained high water bills: A sudden spike in water use without lifestyle changes often means water is leaking somewhere in the system. Persistent moisture or damp spots: Areas on floors, walls or ceilings that stay wet or never fully dry signal ongoing leakage. Water stains and peeling finishes: Discolored patches, bubbling paint or blistering wallpaper point to chronic moisture intrusion. Warm spots on floors: Localized warmth can indicate hot water escaping under slabs or behind walls. Sound of running or hissing water: Hearing water movement when fixtures are off often indicates pressurized leaks. Low or fluctuating water pressure: Noticeable drops in pressure can accompany major leaks in supply lines. If you see these signs, start with a few simple checks—read the water meter and isolate fixtures. If problems continue, call for professional diagnostics to pinpoint the source precisely. How Can You Detect Unexplained High Water Bills and Moisture Indicators? High water bills and hidden moisture usually mean steady, unseen water loss. Confirm it with methodical checks and simple tools: read the water meter with every fixture off—if it moves, you likely have a leak. Then isolate fixtures or shut off valves one at a time to narrow the area. Use a moisture meter and inspect baseboards, carpets and drywall to map damp spots and decide if thermal imaging or acoustic detection is appropriate. In multi‑unit buildings, monitor usage over several days to catch intermittent leaks. If these DIY steps point to persistent or pressurized leakage, schedule professional on‑site diagnostics so the source isn’t misidentified. What Visual and Audible Symptoms Suggest a Hidden Leak? Visual and audible clues help narrow the leak location and urgency. Water stains, peeling paint and mold usually mean a slow, chronic leak in walls, ceilings or around fixtures. Warm floor patches often indicate a slab leak in hot water lines beneath the foundation. Hearing running water, hissing or metallic vibrations with fixtures off suggests pressurized supply lines or a pipe breach—acoustic listening tools can then help pinpoint the section. When symptoms line up—like a high water bill plus a warm floor—focused non‑invasive testing is the next step. If visual or audible signs point to structural or health risks, treat the issue as an emergency and call for immediate help. How Does Frost & Kretsch Plumbing Perform Advanced Leak Detection in Grosse Pointe? Our team follows a staged diagnostic workflow that pairs non‑invasive technology with experienced interpretation to find hidden plumbing leaks accurately. We start with symptom intake and a visual check, move to targeted scans (thermal imaging, acoustic listening, video inspection), then confirm findings with pressure testing or camera inspection as needed. Thermal and acoustic tools reduce unnecessary demolition, while confirmatory tests verify line integrity. We provide transparent pricing, work with licensed and insured technicians, and offer 24/7 emergency response—so when a situation is urgent, we act fast. If repair is needed, we deliver a clear estimate and a straightforward plan so property owners can make informed decisions. Intake & visual assessment: We document symptoms and inspect likely leak zones. Non‑invasive diagnostic scan: Thermal imaging and acoustic tools locate anomalies. Confirmatory tests: Pressure testing or video inspection validate the source. Report & estimate: We provide findings, repair options and transparent pricing. Repair scheduling: We plan minimally invasive repairs or emergency interventions as needed. This step‑by‑step approach sets clear expectations so owners know what to expect during leak detection and what repair options may follow. Which Technologies Are Used for Non-Invasive Leak Detection? Non‑invasive leak detection uses complementary tools that read different signals from escaping water, helping technicians pick the right method for the job. Thermal cameras spot temperature differences from wet insulation or water movement—useful for floors and walls. Acoustic listening devices pick up the sound of water in pressurized pipes and often localize slab and supply‑line leaks precisely. Video inspection cameras let us see inside drains and sewers to identify cracks, roots or blockages without digging. Tracer gas or dye testing can confirm leaks in hard‑to‑reach areas. Often we combine methods to get the most reliable diagnosis based on pipe type and building structure. Different detection technologies compare as follows: Technology Best Use Case Accuracy Limitations Thermal imaging Floor/wall leaks, slab detection High for temperature differentials Less effective in well‑insulated or temperature‑stable spaces Acoustic listening Pressurized supply lines, slab leaks High localization precision Needs a quiet environment and an experienced operator Video inspection Drains, sewer and internal pipe defects Direct visual confirmation Limited to accessible lines and pipe sizes Tracer gas/dye testing Complex underground or void leaks Helpful for confirming leak presence Requires controlled conditions and proper venting A layered diagnostic approach helps us detect hidden leaks with minimal disruption

Professional Leak Detection for Hidden Plumbing Leaks Read More »

Professional technician installing a water softener system in a residential kitchen

Water Softener Installation & Repair for Hard Water

Water Softener Installation & Repair in Grosse Pointe — Local, Reliable Hard Water Solutions Hard water — high in calcium and magnesium — makes soap less effective and leaves mineral buildup on fixtures, appliances, and pipes. This guide shows how professional water softener installation and repair solve those problems in Grosse Pointe. You’ll find clear ways to spot hard water, compare system types (ion-exchange, salt-free, smart/dual-tank), and learn why proper sizing, placement, and maintenance matter for Michigan water. We also cover repair diagnostics, emergency priorities, a straightforward maintenance schedule, and the main cost factors so you can plan with confidence. Along the way you’ll get checklists and practical steps to choose the right solution and keep it running well — plus how a local provider can help with on-site testing, installation, emergency repair, and free estimates without replacing professional advice. What Is Hard Water and How Does It Affect Your Grosse Pointe Home? Hard water contains higher levels of calcium and magnesium that change how water behaves with soaps and equipment. Those minerals form scale inside pipes and on heating elements and aerators, which reduces flow and efficiency and shortens equipment life. In Grosse Pointe and nearby Michigan towns, municipal and well sources commonly fall in moderate-to-high hardness ranges, so treatment is often the best way to protect plumbing and appliances. Knowing the local context and basics of how hard water works helps you decide between a whole-house softener, a targeted filter, or regular monitoring. What Are the Common Signs of Hard Water in Residential and Commercial Properties? You can spot hard water with simple visual and practical checks. Look for white, chalky scale on faucets and showerheads, cloudy or spotted glassware after washing, and soap scum that won’t fully rinse away. People often notice dry, itchy skin or dull hair after showering, and soaps or shampoos that don’t lather well. These signs are easy to confirm with a quick soap test or inspection and usually mean it’s time for a professional hardness test that reports grains-per-gallon (GPG) to guide the right treatment. How Does Hard Water Impact Plumbing Systems and Appliances Over Time? Scale builds up slowly but has clear, measurable effects: it reduces heat transfer on water heaters, raises energy use, clogs pipes and aerators, and cuts water pressure. Over years, dishwashers, washing machines, and boilers need more repairs or parts replacements, and you may use more detergent to get the same results. Understanding those long-term costs makes proactive treatment and routine maintenance a smart investment to protect performance and avoid repeat repairs. How Does Professional Water Softener Installation Solve Hard Water Problems? Professional installation starts with water testing, correct sizing and placement, then careful setup and verification so the whole property gets softened water. Installers match system capacity to measured hardness, household demand, and plumbing layout so the resin tank, brine tank, and control head work as intended. Proper installation prevents common mistakes — wrong bypass plumbing, undersized drains, or incorrect regeneration settings — and delivers predictable benefits: less scale, better soap performance, longer appliance life, and lower energy bills. When you’re ready to act, Frost & Kretsch Plumbing offers on-site testing, system selection help, and full professional installation. Our technicians size and place the system, set it up, and walk you through how it works and what routine care looks like — so your soft-water performance is reliable from day one. Hiring a pro reduces the risk of improper equipment choices or installation errors that can undermine performance. What Types of Water Softeners Are Available for Installation in Grosse Pointe? There are a few common system types, each with strengths depending on hardness level and household needs. Salt-based ion-exchange softeners swap calcium and magnesium for sodium or potassium on resin beads, delivering low-GPG water and strong scale protection. Salt-free conditioners use crystallization or template-assisted methods to limit scale without removing minerals — they’re low-maintenance and avoid salt discharge but may not work as well on very hard water. Dual-tank and smart systems offer continuous service or adaptive regeneration based on real-time use, which helps larger homes or places with variable demand. Below is a quick comparison of the main system types to help you match performance and maintenance preferences to your water conditions. System Type How It Works / Salt Use Pros / Cons / Best Use-case Salt-based ion-exchange Exchanges hardness ions for sodium or potassium on resin; requires salt in a brine tank Very effective for high hardness; needs periodic salt refills and produces brine discharge; best for heavy scale protection Salt-free water conditioner Uses crystallization or template methods to alter mineral behavior without removing ions Low maintenance and no salt discharge; suitable for moderate hardness and homeowners wanting fewer chemicals Dual-tank / continuous softener Two resin tanks alternate for regeneration so one tank always supplies softened water Provides continuous soft water — ideal for large households or commercial use; higher upfront cost but less downtime This comparison highlights trade-offs between effectiveness, upkeep, and environmental impact. Next, see what to expect on installation day and the typical install sequence. What Is the Step-by-Step Process for Installing a Water Softener System? A professional install follows a simple sequence: test and assess, size and pick the system, install and plumb, then commission and train the homeowner. Technicians start with a hardness test and site evaluation, measure flow, and choose a location for the system, bypass, and drain — that determines resin tank size and flow capacity. During install they tie the softener into the main line, program regeneration cycles, and flush the system to clear air and manufacturing residue before final testing. After commissioning, the installer shows you basic upkeep — checking salt, operating bypass valves, and reading regeneration indicators — so you can keep things running between service visits. What Are the Most Common Water Softener Repair Issues and How Are They Resolved? Most softener problems follow familiar patterns and are fixable with methodical checks and targeted parts replacement. Common issues include no soft water

Water Softener Installation & Repair for Hard Water Read More »

Comparison of tank and tankless water heaters in a home setting, highlighting their differences

Tank vs. Tankless Water Heaters: Which is Right for You?

Tank vs. Tankless Water Heaters: Which One Fits Your Home? A Clear, Practical Guide Deciding between a traditional storage (tank) water heater and an on-demand (tankless) system starts with the basics: how each one makes hot water and how that matches your household’s habits. This guide lays out the operational differences, energy and cost trade-offs, sizing and maintenance needs, and local installation realities so you can choose with confidence. For homeowners in Grosse Pointe and nearby Macomb, Oakland, and Wayne Counties, Frost & Kretsch Plumbing offers licensed technicians, transparent pricing with no surprises, a 100% satisfaction guarantee, and 24/7 emergency service to support whatever system you pick. If you’re tired of running out of hot water or watching energy bills climb, this article explains how standby loss, flow capacity, and lifecycle costs play a role — and when it’s time to schedule an on-site estimate. We cover clear technical basics, side-by-side efficiency comparisons, practical sizing examples, and local service options to help you weigh tank vs. tankless from a technical, financial, and everyday-living perspective. Keep reading for plain-language checklists, maintenance schedules, and next steps. What are the main differences between tank and tankless water heaters? A storage tank water heater keeps a reserve of heated water in an insulated tank. A tankless unit heats water on demand through a heat exchanger. That single difference drives how they perform, how efficient they are, and how you size them. Tanks are measured by first-hour rating (how much hot water they can deliver during peak hour); tankless systems are measured by flow rate (GPM) and how much temperature rise they can deliver. Your choice usually comes down to upfront cost versus lifetime energy savings, available space, and how complex a retrofit will be. Frost & Kretsch Plumbing installs and services both types and can help you evaluate which path fits your home. Understanding these functional differences sets the stage for the rest of this guide, where we break down how each system works and what to expect in real life. Feature Tank (Storage) Water Heater Tankless (On-Demand) Water Heater Primary mechanism Stores heated water in an insulated tank Heats water instantly at a heat exchanger as it flows Typical lifespan 10–15 years 20+ years Space footprint Larger (floor or closet-mounted tank) Smaller (compact, wall-mounted unit) Standby loss Present (energy used to keep tank hot) Minimal (no stored hot water) Peak delivery metric First-hour rating (FHR) Flow rate (GPM) and temperature rise This comparison highlights the practical trade-offs between storage and on-demand designs and leads into a closer look at how each one operates and the pros and cons homeowners usually notice. How does a storage tank water heater work and what are its drawbacks? A storage tank water heater heats and holds a set volume of water—usually 30 to 80 gallons—in an insulated cylinder. It uses a gas burner or electric elements and a thermostat to keep the water at your set temperature. That stored volume creates a first-hour rating that predicts peak delivery, but it also causes standby heat loss because the tank must constantly replace lost heat. Over time sediment can settle in the tank and corrosion can form, which reduces efficiency and requires periodic flushing and anode-rod replacement. Without maintenance, performance and life span drop. Typical disadvantages include a limited continuous hot-water supply during very long demand periods, the larger footprint, and higher long-term energy use in many households. These trade-offs are what often push homeowners to consider tankless options — which avoid some issues while introducing others. For many homeowners, the tank’s lower upfront cost and simple operation are strong benefits — but they come with routine maintenance needs. How does a tankless water heater work and what are the benefits? A tankless water heater turns on a heat exchanger when a tap opens, heating water as it passes through. Flow sensors trigger the burner or electric element only when needed, so you get continuous hot water up to the unit’s rated GPM. Advantages include reduced standby losses, a longer service life, and a smaller footprint that frees up closet or mechanical-room space. Tankless units show the biggest efficiency gains in homes with low-to-moderate hot-water use. They do require careful sizing — you must calculate simultaneous flow demands and the temperature rise needed — and some retrofits need upgraded venting, gas supply, or electrical capacity. In areas with hard water, regular descaling is important to protect the heat exchanger. For large households, planning for multiple units can prevent shortfalls. Understanding these strengths and limits helps you see which homes get the most from on-demand systems versus storage tanks. How do tankless and storage tank heaters compare on efficiency and cost? Energy efficiency and lifecycle cost combine operating energy, maintenance, lifespan, and installation price to give total cost of ownership. Tankless units can be about 20–34% more energy-efficient in homes with intermittent hot-water use because they eliminate standby losses. Storage tanks can be more cost-effective in homes with large, frequent peak demands because their first-hour rating meets those peaks without extra cycling. Differences in lifespan and maintenance affect the math: tankless units typically last longer but may need periodic descaling; tanks have predictable tasks like annual flushing and anode replacement. A straightforward numerical comparison and local cost context help homeowners see when a higher upfront cost for tankless pays off over time. System Type Key Metric Typical Value / Impact Tank Energy efficiency Moderate; standby losses increase consumption Tankless Energy efficiency ~20–34% better in low-to-moderate demand homes Tank Lifespan ~10–15 years with maintenance Tankless Lifespan ~20+ years with descaling and proper installation That snapshot shows how efficiency and longevity influence long-term costs and leads naturally into local installation pricing and example savings calculations. How much energy could you realistically save switching to tankless? Tankless models reduce standby losses, the biggest inefficiency in storage heaters, so households with scattered or modest hot-water use can see meaningful fuel savings. Typical real-world savings vary by household, but a family with intermittent hot-water

Tank vs. Tankless Water Heaters: Which is Right for You? Read More »

Modern hybrid water heater in a stylish utility room, emphasizing energy efficiency and design

Hybrid Water Heater Installation & Benefits

Hybrid Water Heater Installation & Benefits: Smarter, More Efficient Hot Water for Grosse Pointe Homes and Businesses Hybrid (heat pump) water heaters pair a heat pump with a storage tank and an electric backup element to deliver hot water using far less electricity than older tanks. Below we walk through how these systems work, realistic energy and cost savings for Grosse Pointe homes and small businesses, how hybrids compare to tankless and traditional models, current Michigan incentives, and what a professional installation and service plan looks like. You’ll get a clear picture of the core technology — how ambient heat is moved into your water — plus practical notes on sizing, placement, noise, permitting, and commissioning so you can decide whether a hybrid is the right upgrade for your property. What is a Hybrid Water Heater and How Does It Work? A hybrid water heater uses a heat pump to pull heat from the surrounding air and transfer it into water stored in a tank, with an electric resistance element available for peak demand or very cold conditions. The heat pump’s compressor circulates refrigerant: the evaporator collects ambient heat, and the condenser (usually wrapped around the tank) releases that heat into the water. Because the system moves heat instead of creating it directly, a hybrid can be two to three times more efficient than a pure electric resistance heater — metrics like COP (coefficient of performance) and UEF (Uniform Energy Factor) show the real-world gains. That efficiency is why hybrids cut electricity use and operating costs compared with older electric or even some gas systems. Performance depends on ambient temperature and where the unit is installed, so choosing the right location and correctly sizing the system are key to realizing those savings. Proper sizing balances tank capacity, recovery rate, and your household’s hot-water habits so the electric backup is rarely needed. The sections that follow explain the physics behind the efficiency gains and list the main components you’ll find in a hybrid unit. How Does Heat Pump Technology Enhance Water Heating Efficiency? Heat pumps move thermal energy rather than producing it, which is why a heat pump water heater can reach COP values of roughly 2.0–3.5 under good conditions. In plain terms, that means one unit of electricity can deliver two to three-and-a-half units of heat to your water — compared with about a 1.0 COP for a resistance element. UEF ratings summarize appliance test results so you can compare models by likely real-world performance. Because the heat pump relies on ambient air, installers usually suggest placing the unit in a conditioned or semi-conditioned space to keep efficiency steady and avoid unnecessary electric backup use. Knowing how temperature affects performance leads naturally to the hardware that makes a hybrid reliable. The next section lists those parts and explains why each one matters for maintenance and longevity. What Are the Key Components of a Hybrid Water Heater? A hybrid water heater combines several interdependent parts: a heat pump compressor and refrigerant loop, an evaporator and condenser coil, a well-insulated storage tank, an electric resistance element for backup, and a control board that manages modes. The compressor moves refrigerant, the evaporator gathers ambient heat, and the condenser transfers that heat into the tank; the electric element adds heat during peak draws or cold spells. The control board watches temperatures, switches between heat pump and electric modes, and handles defrost cycles when needed. Each component has service implications — compressor health, refrigerant charge checks, and anode rod inspection are routine items in a good maintenance plan. Understanding these parts makes it easier to spot likely failure modes and routine checks. The next section covers the benefits Grosse Pointe residents commonly see after upgrading. What Are the Benefits of Hybrid Water Heaters for Grosse Pointe Residents? Hybrid water heaters offer clear, measurable benefits: much lower operating costs, reduced electricity use, a smaller carbon footprint, and often a longer effective service life compared with standard electric tanks. Because they pull heat from the air, hybrids can dramatically cut the portion of your energy bill spent on water heating — one of the larger loads in a home. Lower energy use means lower annual bills and fewer greenhouse gas emissions tied to grid electricity, a relevant point as the regional grid decarbonizes. For homeowners and business owners focused on savings and sustainability, hybrids are a strong candidate. Below is a practical comparison of typical benefits and annual-dollar estimates to help local property owners picture likely outcomes for a medium-size household or a small business. Benefit Typical Metric Estimated Value (example) Energy Savings Annual kWh reduction ~2,000–3,000 kWh/year Annual Dollar Savings Household energy cost reduction Up to $500/year (family of four estimate) Carbon Reduction Lifetime CO2 saved (approx.) Tens to hundreds of kg CO2/year Lifespan/Replacement Expected service life vs electric Longer effective lifespan, fewer replacements That table is a practical snapshot — actual savings depend on your hot-water use, local electricity rates, and the model’s UEF. The paragraphs below unpack dollar savings and environmental impact in plain terms. Agencies estimate families of four can save as much as roughly $500 per year by switching from an electric resistance tank to a high-efficiency hybrid under typical usage and local rates. Savings rise with higher hot-water demand — larger families or businesses with steady hot-water needs see bigger gains. These numbers assume correct sizing and placement so the heat pump does most of the work rather than relying on electric backup. We’ll look next at how those energy savings translate to lower carbon emissions. How Much Can You Save on Energy Bills with a Hybrid Water Heater? Replacing an electric resistance water heater with an efficient hybrid often reduces water-heating electricity use by roughly 50–60%, which can translate to up to about $500 per year for an average family of four under current rates. Your exact savings depend on family size, simultaneous hot-water use, thermostat settings, and local electricity prices — a site-specific assessment gives the best estimate.

Hybrid Water Heater Installation & Benefits Read More »

Technician inspecting a modern water heater in a home setting

Troubleshooting Your Water Heater: No Hot Water Solutions

No Hot Water? Troubleshooting Your Water Heater in Grosse Pointe Losing hot water unexpectedly is more than an annoyance — it affects baths, dishes and daily routines. The cause can be as simple as a tripped breaker or as involved as a failed element or gas ignition issue. This guide walks you through what “no hot water” usually means, why it happens on different systems, and safe checks you can do at home that often restore service without an emergency call. You’ll get the most common causes, a safety-first troubleshooting sequence, type-specific checks for gas, electric and tankless units, and clear signs for when to call a professional. Frost & Kretsch Plumbing serves Grosse Pointe and nearby Macomb, Oakland and Wayne counties with 24/7 emergency service, licensed and insured technicians, and free estimates for maintenance, repair and installation of gas, electric and tankless water heaters — included as a local resource if you need expert help. The guide ends with prevention tips to cut down on future failures and a short FAQ for quick answers about resets and DIY limits. What Are the Most Common Causes of No Hot Water? No hot water usually comes from one of three sources: a supply interruption, a failed heating component, or a control-system problem. Supply issues — like a tripped breaker, a closed gas valve, or an interrupted fuel supply — usually cause a sudden, total loss of hot water. Component failures (burnt elements, bad thermostats, a clogged dip tube) more often cause weak or inconsistent hot water. Control and sensor faults, especially on tankless units, include failed flow sensors, ignition control errors, or scale-triggered codes that stop heating. The quick comparison below helps match symptoms to likely causes and the next step to take. This table lists common causes, telltale symptoms, and quick actions to try before calling a pro. Cause Typical Symptoms Quick Fix / When to Call a Pro Tripped breaker or power loss No hot water at all; other appliances may be without power Reset the breaker; if it trips again, call an electrician Pilot light or ignition failure (gas) Cold water, possible smell of gas, pilot out Follow the manufacturer’s safe relight steps; call a pro if you still smell gas Failed heating element (electric) No hot water or very little hot water Check / reset breaker; if power is present, element replacement may be needed Thermostat or control fault Temperature swings or cycling Try a reset; schedule a licensed technician for diagnosis Sediment buildup Less hot water, rattling or popping sounds, uneven heat Flush the tank; arrange a professional flush if heavy sediment is present Flow sensor / scale (tankless) Error codes, intermittent heat, unit shuts off Run the manufacturer reset; call for descaling or sensor repair if problems persist Pressure relief valve / drain valve leaks Visible leaking or loss of pressure Tighten or test the valve; replace with a pro if it keeps leaking This table helps you see which problems you can safely address and which need a licensed technician. Next up: checks tailored to each water heater type. Which Gas Water Heater Problems Cause No Hot Water? Gas heaters most often fail when the pilot light goes out, the thermocouple stops sensing flame, or the gas control valve malfunctions — any of these will prevent the burners from firing. If the pilot is out and there’s no gas smell, a safe relight following the manufacturer’s instructions will often restore service. If the pilot lights but won’t stay lit, the thermocouple is a common culprit and usually needs replacement by a qualified technician. If you detect a gas smell, strange combustion odors, or repeated ignition failures after safe relighting attempts, evacuate the area and contact emergency services and a licensed professional right away. These gas-specific checks move you from a basic look-over to safe relighting attempts or professional intervention when necessary. What Electric Water Heater Issues Lead to No Hot Water? Electric water heaters usually stop heating because a breaker tripped, an internal high-limit switch tripped, or one or both heating elements failed; bad wiring or a failed thermostat can also be the cause. Start with the breaker panel and look for a reset button on the heater—resetting power can restore service after a temporary overload. If the unit has power but the water stays cold, a heating element or thermostat is likely at fault and needs testing with a multimeter after power isolation. Element or thermostat replacement, and any wiring work, should be done by a licensed electrician or plumber to stay safe and meet code. These checks help you figure out whether a simple reset will do or whether a pro should handle the component work. How Can You Troubleshoot Your Water Heater Step-by-Step? A safety-first, step-by-step approach resolves many no-hot-water problems while keeping people and property safe. Start with general safety and supply checks, then move to type-specific tests and basic resets homeowners can do without special tools. Stop and call a licensed professional if you find a gas leak, burning smells, visible corrosion, or recurring failures. The numbered steps below walk you through the most common causes in a logical order. Safety and awareness check: Smell for gas, note any burning odors, and make sure the area is ventilated before you get close to the unit. Power and fuel verification: Confirm breakers are on for electric heaters and that the gas supply valve is open for gas units. Visual inspection: Look for leaks, standing water, rust, or obvious damage to valves, fittings and venting. Simple resets and relights: Use the heater’s reset button for electric units and follow the manufacturer’s pilot relight steps for gas models — stop immediately if you smell gas. Monitor and isolate: If a fix restores heat temporarily, watch for recurrence; if the problem returns, schedule a professional diagnostic. Following this order reduces risk and quickly shows whether the issue is something a homeowner can fix or if a licensed technician is required. Next are

Troubleshooting Your Water Heater: No Hot Water Solutions Read More »

Modern sump pump in a clean basement, showcasing its functionality and importance in flood prevention

Troubleshooting Your Sump Pump: What to Do When It Fails

Troubleshooting Your Sump Pump: Fast, Practical Steps to Diagnose and Fix Failures Your sump pump is your first defense against a wet basement — it collects water in the sump pit and pumps it safely away from your foundation. When it fails, the risk of flooding and costly water damage rises quickly. This guide walks you through the early warning signs of a failing pump, safe DIY checks you can run at home, and when to call in a pro so a small issue doesn’t become a disaster. You’ll learn to spot common problems like no pumping, nonstop cycling, or strange noises; follow step-by-step troubleshooting (power, float, impeller, discharge); and weigh replacement or backup options, including battery backups. We also cover emergency triggers and simple maintenance routines that prevent most failures, plus checklists and comparison notes to help you choose the right equipment. Practical safety tips and clear guidance on when licensed technicians should handle electrical or pit work are included throughout. What Are the Common Signs Your Sump Pump Is Failing? Most failing sump pumps give obvious clues before a complete breakdown. Watch for the pump not starting when the pit fills, rapid on/off cycling (short-cycling), grinding or rattling noises from the motor or impeller, standing water in the pit or slow drainage, and alarms or erratic behavior from sensors. Catching these signs early lets you run quick triage checks — power, float movement, and a simple pour test — to narrow whether the issue is electrical, a stuck float, or a mechanical clog. Below are the high-priority symptoms and what they usually mean. The most common signs of sump pump failure are: Pump not turning on: Nothing runs when water reaches the activation level. Continuous or frequent cycling: The pump runs constantly or cycles on and off rapidly — a classic sign of short-cycling. Unusual noises: Grinding, rattling, or whining can mean impeller damage or motor wear. Basement water accumulation: Water on the floor or slow pit drainage shows the pump isn’t clearing water effectively. Alarms or erratic operation: Random starts/stops or alarm triggers point to electrical or sensor problems. If you notice any of these, do basic checks right away — confirm power, check the float position, and perform a pour test. Early action cuts the chance of flooding and costly cleanup. Frost & Kretsch Plumbing handles sump pump diagnostics and emergency response across the Grosse Pointe area. Our licensed technicians give clear estimates and fast triage when DIY checks don’t resolve the problem. If you’re unsure after the quick tests, schedule a local inspection for peace of mind. How to Identify When Your Sump Pump Is Not Pumping Water First, confirm whether the pump actually fails to start when water reaches the activation level. Do a controlled pour test: add a bucket of water to the pit to lift the float and watch whether the pump starts and discharges properly. If it doesn’t, check the circuit breaker and any GFCI outlets, then test the outlet with a non-contact tester or multimeter — no power usually means an electrical issue. If the outlet has power but the pump stays quiet, listen for a motor hum (a sign of a seized motor) and inspect the intake and impeller area for blockages. If these basic checks don’t restore operation, the unit may need mechanical cleaning or service to replace a seized motor or damaged impeller. If the pour test produces only partial or intermittent pumping, suspect a worn impeller, a partial clog, or a sticking float — all of which can get worse in heavy rain. If electrical tests show power but the pump won’t start even after a reset (when a reset exists), stop disassembly and call a professional to avoid electric-shock or further damage. What Causes a Sump Pump to Run Continuously or Make Noise? Nonstop running or rapid cycling usually stems from float switch issues, a failed check valve, or groundwater coming in faster than the pump can handle. A tethered float can snag on the pit lip or piping, or a vertical float can bind on debris and stay in the “on” position. A bad or missing check valve lets discharged water return to the pit, causing repeated starts. Noises — grinding, rattling, loud humming — often mean debris in the impeller, worn bearings, or motor strain from running under load. Diagnosing noise correctly needs a visual intake check and a controlled run to pinpoint where the sound is coming from. Often the fix is simple: clear debris, free or replace the float, and confirm the check valve works. But if the motor sounds mechanically damaged or the unit overheats, stop using the pump and contact a licensed technician — persistent noise while water is rising is an emergency risk for motor burnout and flooding. How Can You Troubleshoot Your Sump Pump Step-by-Step? Troubleshooting should follow a safe, logical order: start with low-risk checks and move toward mechanical inspection only when power is off. Safety first — cut power before touching wiring or removing covers, use a flashlight, and avoid standing in water while testing electrical parts. The steps below isolate the three main fault groups — electrical, float/sensor, and mechanical/clogging — so you can tell which issues you can fix yourself and which need a pro. Follow the numbered sequence and use the recommended tools and safety notes. Safety and power check: Confirm the circuit breaker and any GFCI are reset and test outlet power with a non-contact tester or multimeter. Pour test: Add water to the pit to raise the float and observe whether the pump starts and how it discharges. Float and linkage inspection: Look for stuck or tangled tethered floats and make sure vertical floats move freely. Intake/impeller check: With power off, remove the pump (if user-serviceable) to inspect and clear debris around the impeller and housing. Discharge line and check valve: Check for kinks, blockages, or backflow; observe check valve operation while the pump runs. When to escalate: Call

Troubleshooting Your Sump Pump: What to Do When It Fails Read More »

Pedestal sump pump installation in a basement, highlighting its above-ground motor and protective function against water intrusion

Pedestal Sump Pump Installation & Repair

Pedestal Sump Pump Installation & Repair in Grosse Pointe — Reliable Solutions for Homes and Businesses A pedestal sump pump is an above-ground basement pump with its motor mounted above the sump pit. It prevents water damage by removing rising groundwater before it soaks into foundations or finishes. This guide walks you through how pedestal sump pumps work, when they’re a better choice than submersible units, what professional installation looks like, common repairs, and practical maintenance steps. If you manage a home or business that sees heavy seasonal rain, spring snowmelt, or localized stormwater, it helps to know how float switches, impellers, discharge piping, and battery or water-operated backups work together to protect your property. You’ll also get simple diagnostic checks you can do safely, signs that mean you should call for emergency service, and a maintenance calendar to extend pump life and reduce downtime. Sections cover definitions and comparisons, step-by-step installation and replacement guidance, troubleshooting and emergency response, routine maintenance and backup options, reasons to choose a local qualified contractor, and short FAQs on cost and lifespan. Keywords like pedestal sump pump, pedestal sump pump installation, pedestal sump pump repair, battery backup sump pump, and sump pump maintenance are used throughout to help you find the most useful information. What is a Pedestal Sump Pump and How Does It Protect Your Basement? A pedestal sump pump has its motor mounted above the sump pit and uses a vertical shaft to turn an impeller that pushes water out through a discharge pipe. Because the motor stays out of the standing water, electrical components are easier to inspect and service. A float switch senses rising water, triggers the motor, and the pump ejects water away from the foundation—lowering hydrostatic pressure and cutting the risk of basement flooding. Homeowners and building managers often pick pedestal models when pit size, service access, or budget make an above-ground motor the practical choice. In short: they offer visible, easy-to-service protection that fits many homes and light commercial spaces. Pedestal pumps have strengths and trade-offs that matter in Grosse Pointe’s climate and building stock. If your pit is shallow or you want quick motor access for maintenance, a pedestal pump is a good fit. If you need a quieter setup inside a finished basement, a submersible unit might be preferable. Frost & Kretsch Plumbing installs and services pedestal pumps locally and can do an on-site inspection to match pump horsepower, pit size, and discharge routing to your property. That local check helps decide whether a pedestal pump, a battery backup sump pump, or a water-operated backup is right for you—and starts a transparent conversation about price and service expectations. Below is a quick comparison of common pedestal pump characteristics to help you evaluate options and plan maintenance. This table summarizes pedestal pump attributes so you can compare models and inspection priorities at a glance. Attribute Typical Characteristic Practical Impact Motor Location Mounted above the sump pit Makes inspections and repairs faster and simpler Typical Horsepower Usually between 1/3 and 1 HP Controls flow rate and how high water can be discharged Maintenance Access High Shorter service times and easier troubleshooting Best Use Cases Shallow pits or when visible motor is preferred Cost-effective for many residential installations This comparison highlights why pedestal pumps are chosen for accessibility and serviceability, while noise and exposed components are trade-offs to weigh against a submersible option. The next section explains the mechanics that make these systems work during a flooding event. How Does a Pedestal Sump Pump Work to Prevent Basement Flooding? Pedestal sump pumps stop basement flooding with a simple, reliable sequence: a float switch detects rising water, the float activates the motor mounted above the pit, and the impeller pushes water up and out the discharge pipe. For dependable operation you need a clear intake, a correctly sized impeller and shaft, and an unobstructed discharge line with a working check valve to prevent backflow. When installed and sized properly, the pump responds in seconds to minutes depending on horsepower and discharge head—enough to keep pace with many storm inflows. Regular testing—freeing the float, checking the impeller, and confirming the discharge route—is the simplest way to keep the system ready when you need it most. What Are the Benefits of Choosing a Pedestal Sump Pump Over Other Types? Pedestal pumps are valued for serviceability and straightforward maintenance. With the motor above the pit, you can inspect and replace electrical components without pulling the entire unit from the pit—often saving time and money. Technicians find pedestal units easier to bench-test and diagnose, which speeds repairs to float switches and motors. Trade-offs include louder operation and visible components in the basement, so consider aesthetics and sound if the space is finished. The best choice pairs the pump’s horsepower and impeller design to your pit size, discharge head, and local flood risk. Three main advantages of pedestal pumps: Easier Maintenance: Motor access above the pit makes repairs and tests faster. Shorter Service Time: Quicker diagnosis lowers technician labor and downtime. Fits Special Pits: Works in shallow or awkward pits where submersible pumps won’t fit. Knowing these benefits helps explain why professional installation matters for long-term reliability. How Does Professional Pedestal Sump Pump Installation Ensure Reliable Performance? Professional installation reduces common failures by matching pump horsepower and model to pit dimensions, expected inflow, and the length of the discharge run, while ensuring secure mounting and safe electrical connections. Licensed technicians evaluate pit diameter, routing for the discharge pipe, check valve placement, and local permit or code needs before selecting the right float switch and impeller. Proper installation includes solid pedestal mounting to reduce vibration, correct shaft alignment to protect the motor and impeller, and routing the discharge to a safe outflow point with a check valve that prevents recharge into the pit. Installers also test the system under simulated loads and walk you through operation, maintenance tasks, and backup options so you know what to expect during storms. Installation follows a clear workflow

Pedestal Sump Pump Installation & Repair Read More »

Scroll to Top