
How to Replace a Showerhead — An Easy DIY Guide for Homeowners
Swapping a showerhead is one of the simplest, most noticeable DIY updates you can do for your bathroom. For most standard screw-on fixtures, the job takes about 15–30 minutes when the shower arm and threads are in good shape. This guide walks you through the tools to gather, step-by-step removal and installation, and quick tests to check for leaks or weak pressure. You’ll also learn warning signs that mean it’s time to call a plumber, what affects cost, and which showerhead styles make the easiest upgrades. Read on for clear checklists, practical tips, and troubleshooting steps written for homeowners tackling a straightforward showerhead replacement.
What Tools and Materials Do You Need to Change a Shower Head?
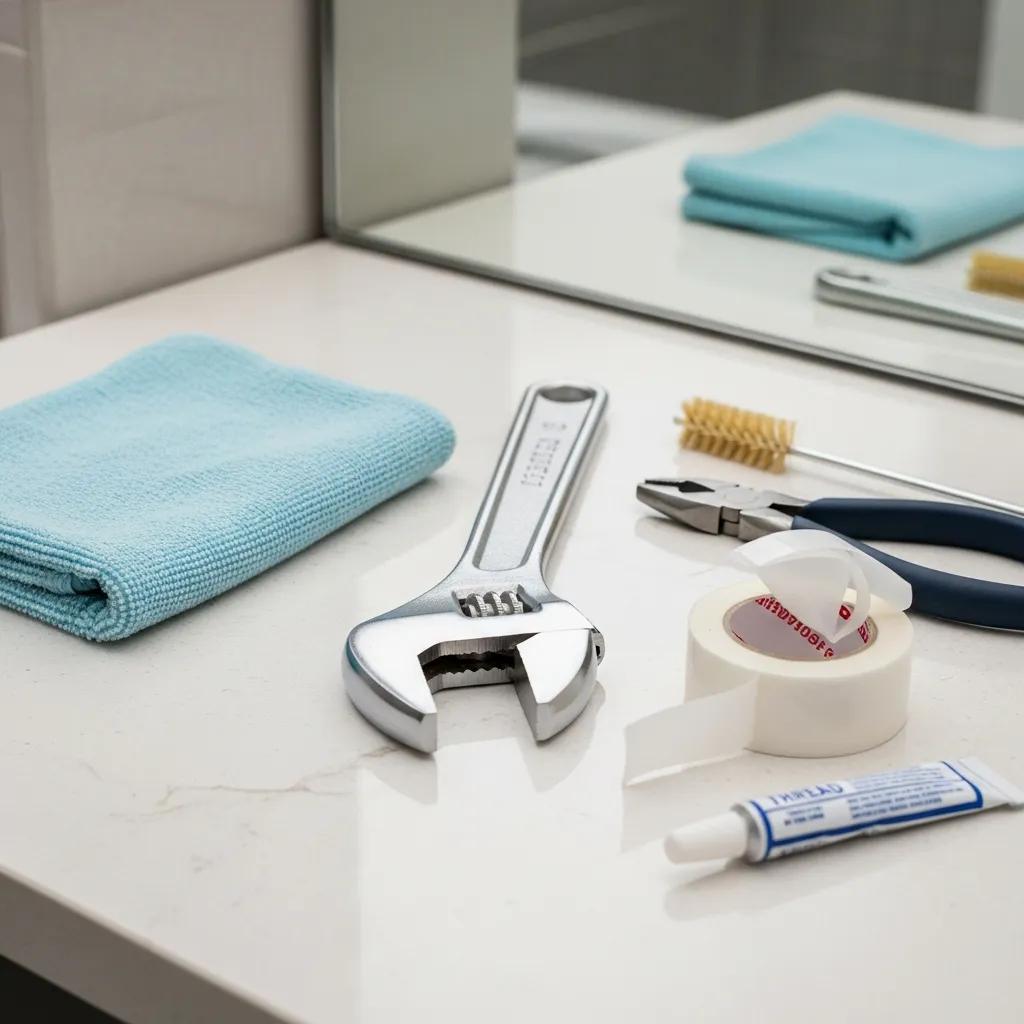
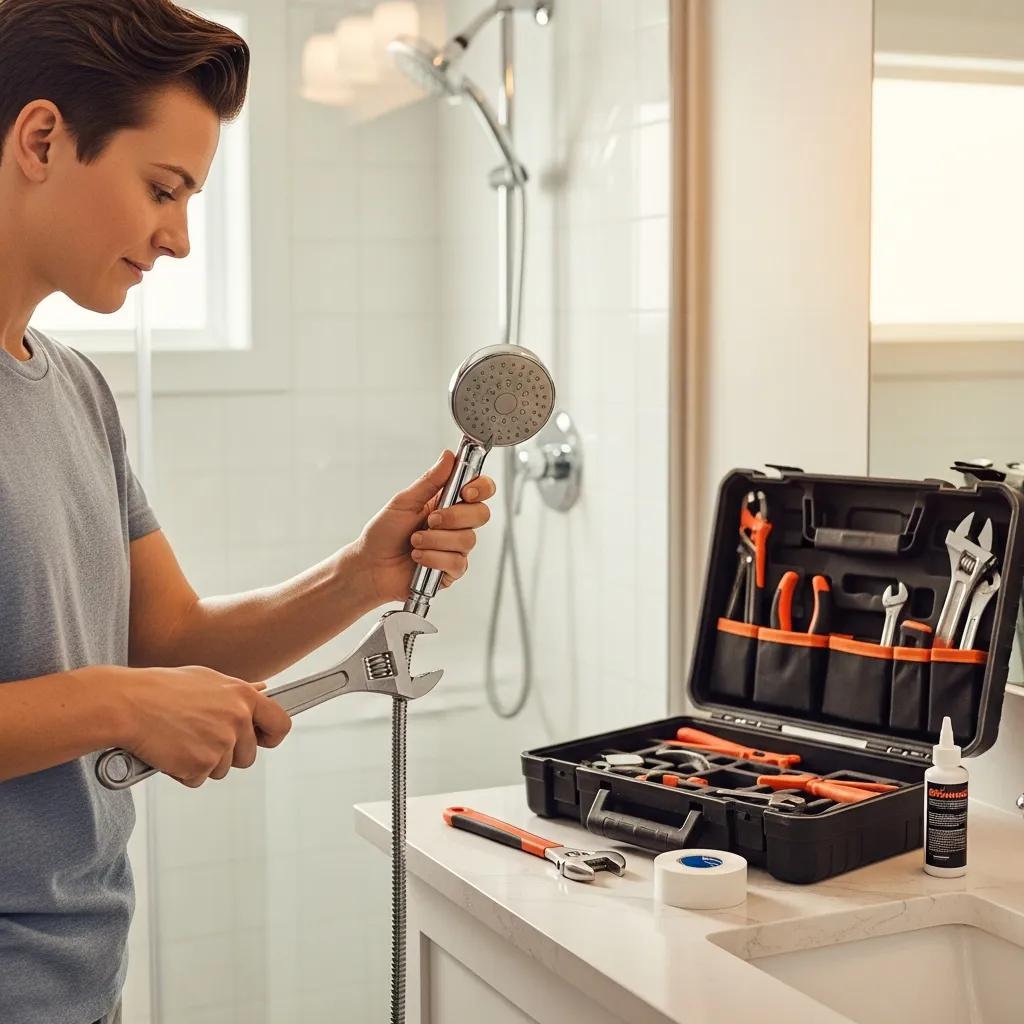
A successful showerhead swap starts with a small set of reliable tools and a few supplies to seal threads and protect finishes. The basics handle tightening, thread sealing, and light corrosion cleanup. A couple of optional items are helpful if the old head is stuck or you’re working with a high-end fixture. Lay everything out before you begin to avoid pauses, reduce the chance of scratches or cross-threading, and make the job faster and cleaner.
Use this quick reference to build a compact toolkit before you start.
| Tool or Supply | Purpose | Practical Value |
|---|---|---|
| Adjustable wrench | Loosens and tightens the showerhead without needing specialty tools | Works on most threaded connections |
| Plumber’s tape (PTFE) | Seals the male threads to prevent leaks | Essential for a reliable, watertight connection |
| Rag or painter’s tape | Protects chrome or brass finishes from wrench marks | Prevents cosmetic damage during turning |
These inexpensive items cover the majority of standard installations. Having them at hand shortens the job and lowers the chance you’ll need a pro for a minor issue.
Which Basic Tools Are Essential for Showerhead Replacement?
The essentials focus on two things: apply torque safely and seal threaded joints properly. An adjustable wrench gives the leverage needed to finish the job, while rags or painter’s tape protect visible finishes. PTFE (plumber’s) tape fills tiny gaps between threads and is the standard way to prevent slow leaks — always wrap the male threads before installing the new head. With these basics ready, most homeowners can swap a showerhead cleanly without specialized plumbing gear.
If the old head is seized or heavily corroded, a couple of optional tools can make removal easier — that’s the next section because stuck heads often need different techniques.
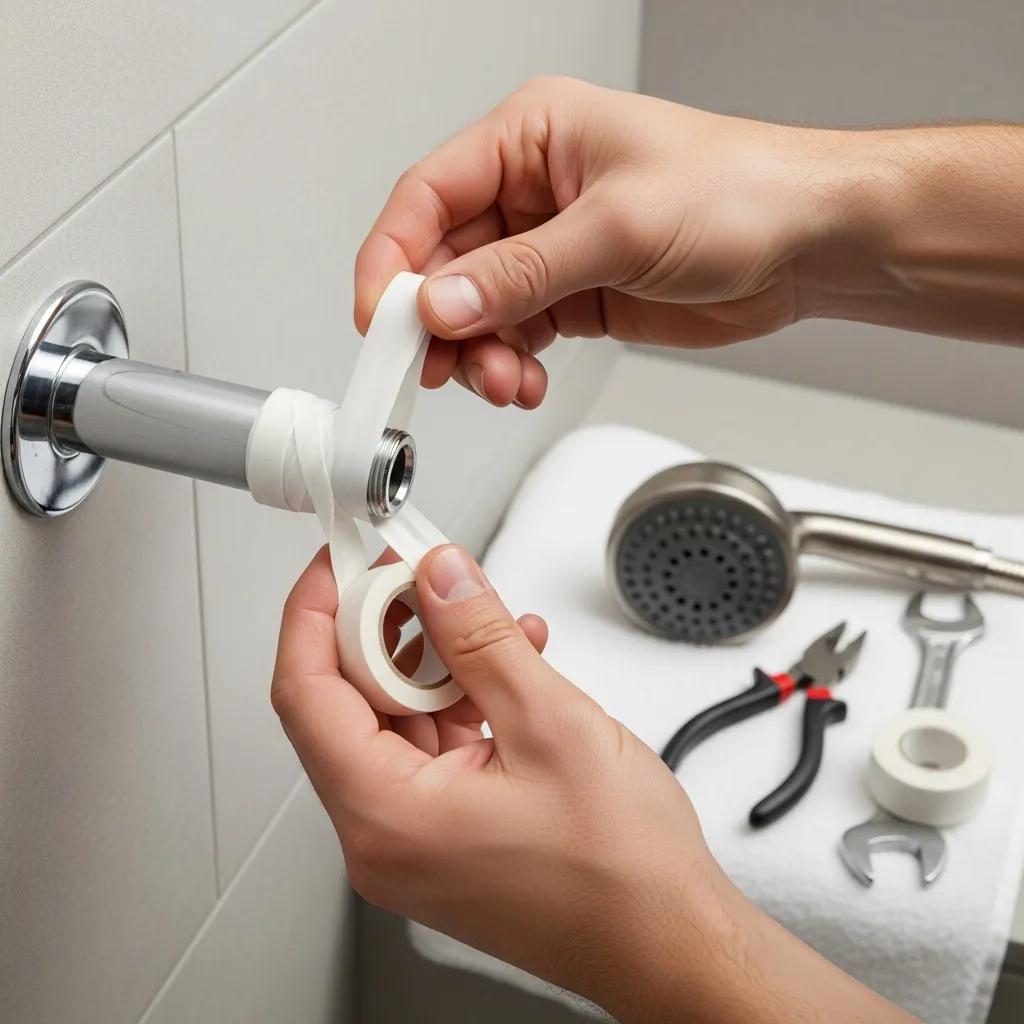
Why Is Plumber's Tape Important for a Leak-Free Installation?
Plumber’s tape (PTFE) creates a thin barrier that fills small gaps between the arm and the fitting so water can’t track along the threads. Wrap the tape clockwise around the male threads two to four turns so it follows the direction you’ll tighten the head; this helps the tape stay smooth as you thread the fitting by hand. Common mistakes are wrapping the wrong way, using too much tape, or skipping it entirely — any of those can cause slow leaks. Correct PTFE use is low-effort and one of the simplest steps to avoid a repeat visit after installation.
With thread prep sorted, the hands-on removal and installation steps below show how to finish the job without damaging finishes or misaligning the fitting.
What Are the Step-by-Step Instructions to Replace a Showerhead Yourself?
Replacing a showerhead follows a simple sequence: stop or isolate water flow if needed, remove the old head, prepare the arm, seal the threads, and install the new head. For most threaded showerheads the whole process — tools out to final test — takes about 15–30 minutes when threads and arm are in good condition. Take basic safety steps like covering the drain, protecting finishes, and avoiding over-tightening, which can strip threads or crack plastic parts. Follow the numbered steps below for a reliable exchange.
- Prepare the area and tools: Close the drain, lay down a towel, and assemble your wrench, rag, and plumber’s tape.
- Remove the old showerhead: Wrap the head with a rag and turn counter-clockwise by hand; use an adjustable wrench for final turns.
- Clean and inspect threads: Wipe away old tape and mineral build-up; check the shower arm for damage or bends.
- Apply plumber’s tape: Wrap the male threads clockwise 2–4 turns.
- Install the new showerhead: Thread it on by hand until snug, then finish with the wrench using a rag—don’t over-tighten.
- Test for leaks and function: Run the water, look for drips, and adjust the head’s orientation as needed.
Careful thread prep and measured torque are the two most common reasons installs succeed. If you hit heavily corroded parts or signs of valve trouble, the job may need a different approach.
When an installation becomes tricky or you want a guaranteed result, Frost & Kretsch Plumbing offers professional service. Our technicians provide transparent pricing and thorough cleanup, and they can handle tougher jobs like extracting corroded arms or diagnosing hidden leaks.
How Do You Remove the Old Showerhead Safely?
Protect finishes and keep the area secure to avoid dropping parts that could chip the tub or tiles. Use a cloth over the head and apply steady counter-clockwise pressure with your wrench — avoid sudden jerks that can scratch or fracture fixtures. If mineral buildup has seized the head, try a penetrating oil and let it sit, then attempt removal again. Gentle heat can free metal-on-metal threads but use care near caulk, grout, and plastic. If removal risks damaging a decorative arm or nearby plumbing, pause and call a pro rather than causing more costly damage.
If removal is straightforward, move on to cleaning and prepping the arm for installation as described next.
How to Install the New Showerhead Correctly to Avoid Leaks?
Make sure the shower arm is clean and free of old tape, corrosion, or debris that could prevent a good seal. Wrap the male threads clockwise with PTFE tape, hand-thread the new head to ensure proper engagement, and then use a wrench over a rag to snug it—do not over-tighten, especially on plastic parts. Run the shower and inspect the joint for drips; a small persistent leak usually means you need another wrap of tape or a new washer. If leakage continues behind the wall or at the valve, stop and call a licensed plumber.
Following these steps protects both the finish and the home from water damage and helps you decide when to move from DIY to professional help.
When Should You Call a Professional Plumber to Install Your Shower Head?
Calling a pro makes sense when the job goes beyond a simple screw-on swap. Hire a plumber if threads are badly corroded, you find leaks behind the wall, you need to re-plumb for a different fixture type, or you’re installing heavy ceiling- or wall-mounted rainheads that need extra support or permits. Pros are also recommended for smart fixtures that involve electrical or control modules, or when a manufacturer’s warranty requires licensed installation. Use these criteria to weigh time, risk, and warranty protection before continuing with DIY.
- Corroded or seized shower arm: A pro can remove and replace without damaging surrounding finishes.
- Hidden leaks or wall moisture: Professionals run diagnostics to locate leaks inside walls.
- Complex fixture upgrades: Ceiling rainheads, hard-plumbed units, or smart systems may need other trades.
- Warranty or safety requirements: Some manufacturers require licensed installation to keep coverage valid.
These guidelines help protect your home and reduce repeat calls. Frost & Kretsch Plumbing serves Grosse Pointe and nearby counties (Macomb, Oakland, and Wayne) with licensed, insured technicians, 24/7 emergency service, transparent pricing, and a satisfaction guarantee — useful options when a job grows beyond a basic DIY swap.
What Complex Issues Require Expert Plumbing Services?
Complex problems include shower arms that are corroded in place and need cutting or pipe replacement, internal valve leaks that require access behind the wall, or situations where swapping the showerhead also means changing valves or supply lines. Pros handle pressure testing, partial wall access, and code-compliant replacements that protect the structure and system. Attempting invasive repairs without the right tools risks leaks, mold, and expensive structural damage. If you spot metal fatigue, heavy rust, or recurring moisture stains, those are red flags for professional intervention.
When a job is more than a threaded fitting, complexity drives labor, materials, and cost — something to consider before tackling the repair yourself.
How Does Frost & Kretsch Plumbing Ensure Quality Showerhead Installation in Grosse Pointe?
We rely on licensed, insured technicians and clear service standards to reduce homeowner risk and deliver dependable results. Our process emphasizes transparent, upfront pricing so you know the scope before work begins, and our team receives ongoing training to handle both simple replacements and more complex installs. We offer emergency availability, prompt response for urgent issues, careful cleanup, and a satisfaction guarantee — all designed to give homeowners confidence when a DIY job turns professional.
These service qualities help homeowners decide whether a replacement is a straightforward DIY task or better handled by a local pro with warranty-backed work and emergency support.
How Much Does Shower Head Installation Cost and What Affects Pricing?
Cost depends largely on complexity, required repairs, fixture type, and whether plumbing or electrical work is needed. Major cost drivers include corroded shower arms that need replacement, valve or cartridge repairs behind the wall, ceiling-mounted rainheads, and smart fixtures that require electrical integration. DIY installs keep expenses low — mainly the new showerhead and a few supplies — while professional work adds labor, diagnostics, and any replacement parts. Knowing these cost drivers helps you estimate effort, risk, and whether to request a pro quote.
| Cost Factor | DIY Impact | Pro Impact |
|---|---|---|
| Shower arm corrosion | High — may halt a DIY attempt | Requires pro extraction and replacement |
| Valve or cartridge failure | Low — typically not a DIY task | Needs diagnostics and possible wall access |
| Ceiling-mounted rainhead | Medium — needs proper support | May require new supports and permits |
| Smart shower systems | Low — electrical and control complexity | Coordination with electricians and licensed pros |
What Are Typical Costs for DIY vs. Professional Installation?
DIY costs are mainly the price of the showerhead plus a few supplies — plumber’s tape, a washer, and maybe a small tool — and your time. Professional installation adds labor, diagnostic time, parts, and guarantees; pros also cover unexpected repairs discovered during the job. If work reveals corroded arms, valve problems, or leaks behind the wall, professional help usually prevents recurring issues. Frost & Kretsch Plumbing offers clear upfront estimates so you can decide whether a simple install is still the right option.
How Do Different Showerhead Types Influence Installation Expenses?
Design and mounting style affect difficulty: standard screw-on models with 1/2″ threads are low-complexity, while overhead rainheads, ceiling-mounted units, multi-function systems, and smart showerheads can require extra supports, supply runs, or electrical work. Smart systems often need control modules or thermostatic valve upgrades that go beyond a basic threaded swap. When shopping, check whether a model is a direct screw-on replacement or requires hard-plumbing changes — the latter usually means hiring a pro to meet code and ensure reliable operation.
Which Are the Best Shower Heads for Easy Installation and Upgrades?
For an easy DIY swap, choose models that use standard 1/2″ threaded connections, include a rubber washer, and are lightweight so they don’t stress the arm. WaterSense-labeled low-flow heads typically install the same way as standard models and save water without extra plumbing. Handhelds with compatible brackets are a simple upgrade if your existing holder fits, and many multi-function heads attach to the same threads. Picking a compatible design cuts installation time and lowers the risk of needing professional help.
| Showerhead Type | Ease of Installation / Flow Rate | Best Use |
|---|---|---|
| Standard screw-on | Easy / ~2.5 GPM typical | Everyday replacement |
| Handheld | Easy to medium / varies | Accessibility and rinsing |
| Rain (ceiling or arm-mounted) | Medium to hard / varies | Luxurious experience; may need support |
| Low-flow (WaterSense) | Easy / ≤2.0 GPM | Water saving and compliance |
What Features Make a Showerhead Easy to Replace or Install?
Look for packaging that states a standard 1/2″ threaded connection, includes a rubber washer, and has clear instructions — those features remove guesswork. Lightweight heads reduce strain on older arms, and swivel joints or universal brackets increase compatibility. Avoid models that need special adapters or proprietary modules unless you’re prepared for extra parts or pro labor. Checking these details before purchase helps ensure a straightforward swap.
How Do Water-Saving and Smart Showerheads Impact Your Choice?
Water-saving models with WaterSense labeling usually install the same way as standard screw-on heads, making them an easy way to cut water use. Smart systems, however, may need electrical hookups, control modules, or valve upgrades that increase complexity and cost; these often require licensed pros to preserve warranties and ensure safe operation. If you want smart features, consider buying a smart-ready valve or hiring a pro for the initial install to balance long-term benefits with short-term complexity.
How Can You Troubleshoot and Fix Common Showerhead Problems?
Common issues — leaks, drips, clogged nozzles, and low pressure — can often be diagnosed with a few simple checks that separate fixture problems from whole-house supply issues. Start by identifying whether a leak is at the threaded joint (visible where the head meets the arm) or from the valve (water continues when the head is removed). For clogs or low pressure, cleaning nozzles and flow restrictors usually fixes the issue. If multiple outlets show low pressure, it’s likely a system-wide concern. These troubleshooting steps help you pick the right fix or know when to call a professional.
- Inspect thread seals first: Look for drips at the joint and reapply PTFE tape if needed.
- Clean nozzles and flow restrictor: Remove mineral deposits by soaking or using a soft brush.
- Test with head removed: If pressure is low at the arm, the supply — not the head — is the issue.
- Monitor for valve leaks: Drips when the shower is off often point to a valve or cartridge problem.
Follow this checklist to handle the simplest fixes yourself. If problems persist after these steps, schedule a licensed diagnostic to locate hidden issues behind walls or inside the valve assembly.
How to Identify and Repair a Leaking or Dripping Showerhead?
First confirm whether the leak is at the threaded joint or from the valve: a joint leak usually stops when you remove the head, while a drip that continues with the head off points to a valve issue. For thread leaks, remove the head, clean the male threads, rewrap with plumber’s tape, and reinstall. If parts inside the showerhead are failing, replacing the head is often the best fix. If the valve drips when off, replacing a cartridge or calling a professional is the correct next step. Persistent leaks behind walls require a licensed plumber to avoid hidden water damage.
What Are Solutions for Low Water Pressure and Clogs?
To restore pressure or even spray, start by removing the head and checking for mineral buildup on nozzles or a clogged flow restrictor. Soaking the head in a descaling solution or using a soft brush typically clears blockages. If you need more flow and local codes allow it, follow manufacturer guidance for flow restrictor removal. If pressure is low at the arm itself, test other fixtures to see if it’s a house-wide issue — low main pressure or partly closed supply valves call for broader plumbing work. When fixture-level fixes don’t help, schedule a professional inspection to test whole-home pressure, check for blocked lines, or evaluate a failing pressure-balancing valve.
These practical steps resolve most common problems and help you decide whether a quick DIY fix or professional diagnostics are the right next move.
Frequently Asked Questions
1. How often should I replace my showerhead?
Replace most showerheads every 6 to 8 years, depending on use and water quality. Hard water speeds mineral buildup and can reduce performance. If you notice lower pressure, persistent leaks, or visible corrosion, it’s a good time to replace the head. Regular cleaning of the nozzles can extend its useful life, and upgrading sooner is reasonable if you want better efficiency or a fresher look.
2. Can I install a showerhead without professional help?
Yes — most homeowners can install a standard screw-on showerhead using basic tools like an adjustable wrench and plumber’s tape. A typical install takes 15–30 minutes. If you run into corroded threads, hidden leaks, or anything that risks damaging finishes, it’s wise to consult a professional.
3. What should I do if my new showerhead is leaking?
Start at the threaded connection: remove the head, clean the male threads, and reapply PTFE tape (wrapped clockwise) before reinstalling. Check the washer or O-ring inside the head for damage and replace if needed. If the leak continues, the problem may be the valve or internal plumbing — call a licensed plumber for a diagnostic.
4. Are there specific showerhead types that are easier to install?
Standard screw-on showerheads with 1/2″ threaded connections are the easiest to install. Handheld heads are also straightforward if your bracket is compatible. Ceiling-mounted rainheads and smart systems are more complex and often better handled by a professional because they may need supports, new supply lines, or electrical work.
5. How can I improve water pressure in my shower?
Begin by checking for clogs in the showerhead — mineral deposits are a common cause. Soak the head in a descaling solution or brush the nozzles. Make sure supply valves are fully open and inspect for leaks. If these steps don’t help, contact a plumber to assess whole-house pressure and look for blocked lines or failing valves.
6. What are the benefits of using a low-flow showerhead?
Low-flow, WaterSense-labeled showerheads use about 2.0 GPM or less, cutting water and energy use while often maintaining good spray feel. They lower bills, reduce environmental impact, and many modern low-flow models are engineered to keep a satisfying shower experience.
7. How do I choose the right showerhead for my needs?
Consider flow rate, installation type, and features you want. If efficiency is a priority, look for WaterSense models. For flexibility, choose a handheld. For a spa-like feel, consider a rainhead but be prepared for added complexity. Always confirm compatibility with your existing plumbing and match the installation difficulty to your DIY comfort level. Reviews and product specs will help you decide.
Conclusion
Replacing a showerhead is a quick, high-impact DIY project that can improve performance, save water, and freshen your bathroom’s look. With a few simple tools and the right steps, you can complete a leak-free install in under an hour. If you hit corrosion, hidden leaks, or anything beyond a threaded swap, don’t hesitate to contact a licensed plumber. Ready to upgrade? Browse quality showerheads or reach out to Frost & Kretsch Plumbing for help with more complex installations.